Your first capture
Print a test document, see CriticalPDF's review window open, and route the capture with one click.
This walkthrough takes about three minutes. It assumes you’ve already installed the suite and activated your trial or license.
Step 1 — Confirm the default template is set to “Ask each time”
Open CriticalPDF from the Start menu and go to Settings → Templates. The Default template should already exist with its Action set to Ask each time. That’s what we want for this walkthrough — it makes the review window pop on every capture so you can see what’s happening.
Step 2 — Print a test document
Open any document — a Word file, a web page, even a Notepad txt. From the File menu:
- Choose Print.
- Pick CriticalPDF as the printer.
- Click Print.
The print dialog closes immediately.
Step 3 — The review window opens
Within a second or two, CriticalPDF’s review window appears showing the captured PDF on the left and three info panels on the right:
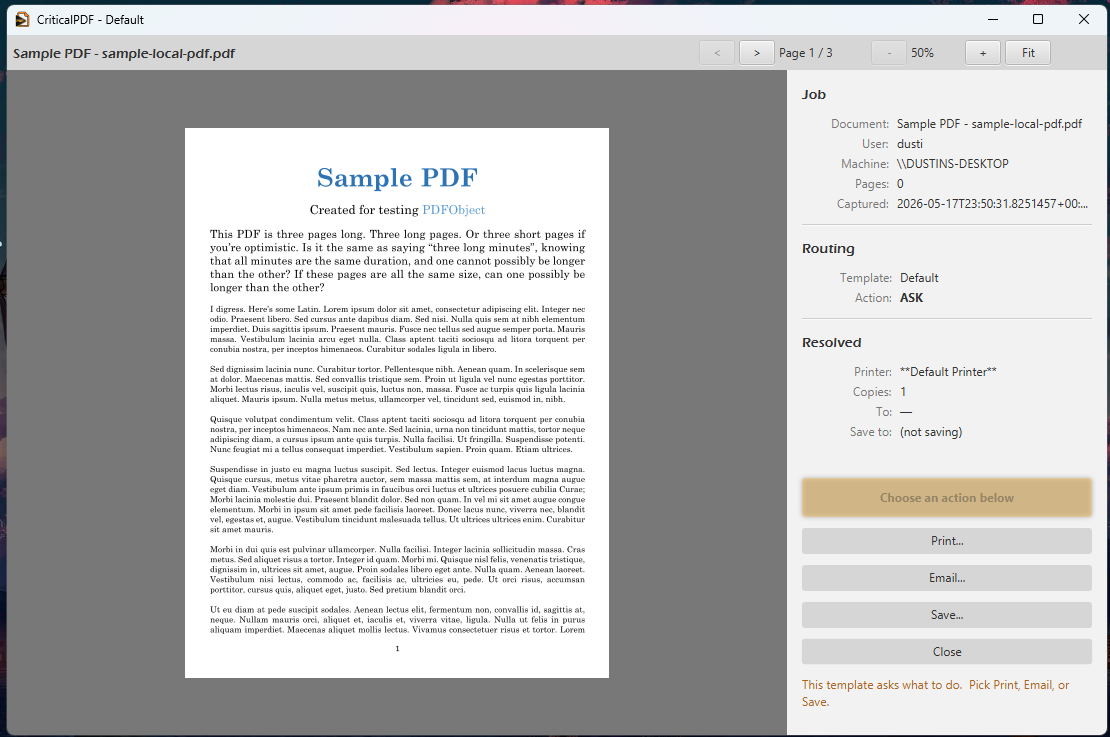
- Job — Document name, the user who printed, the originating machine, page count, and capture timestamp.
- Routing — which template matched and its action (here,
ASKfor “Ask each time”). - Resolved — the concrete delivery destinations as the template would run them (default printer, save path, To address). Greyed values mean that destination is not active for this template.
Below the panels are the action buttons — Print…, Email…, Save…, Close.
Step 4 — Pick an action
Click Save…. A standard Windows save dialog opens — pick a folder and a filename, hit Save. The review window closes and the PDF lands at the path you chose.
That’s a complete round-trip. The capture was routed by the Default template, the Action was ASK so the review window opened, and you picked Save manually.
What just happened
- The driver rendered your print job to PDF and queued it in the Windows spooler.
- CriticalPDF Service detected the job (sub-second via Win32 notifications, with a 1-second
EnumJobspoll as backup) and piped the PDF to the desktop app — running as your Windows user viaCreateProcessAsUserwith an anonymous stdin pipe. - The desktop app read the captured text, found no matching
<0>...</0>identifier tag, and fell through to the Default template. - The template’s Action was
Ask each time, so the review window opened. - You picked Save — the file was written and the capture marked complete.
Next steps
You don’t normally want every capture to ask. Build a template per document type so the right thing happens automatically:
- Templates — define one per document type and pin an action (Email, Save, Print, or any combination).
- Variable substitution — embed
<1>...</1>tags in your source documents and have CriticalPDF substitute the values into file names, email subjects, and bodies. - Email providers — sign into Gmail / Microsoft 365 / SMTP / Computer Team so templates can email PDFs out.
- PDF encryption — lock the PDF down with per-template permissions before it leaves the machine.
Was this page helpful? Let us know.