Installation
Install the CriticalPDF Suite on a Windows desktop or Server RDP host and activate your license.
Prerequisites
- Operating system, 64-bit:
- Windows 10 (build 1809 or later) or Windows 11 for workstation installs.
- Windows Server 2016, 2019, 2022, or 2025 for RDP / RDS hosts. One install serves every user on the host, and each Windows account gets its own per-user templates and settings — see Group Policy / SCCM for the multi-user details.
- Local Administrator rights on the target machine.
- ~500 MB free disk for the suite, plus space for your captures.
You do not need to install .NET or any other runtime — the MSI ships everything required.
Step 1 — Download the MSI
Grab the latest signed MSI from the Downloads page — it’s roughly ~190 MB. The filename pattern is CriticalPDF-Suite-<version>.msi — for example, CriticalPDF-Suite-2026.517.37.msi for Suite version 2026.517.37.0. The trailing .0 is dropped from the filename.
Verify the SHA-256 hash before installing. The Downloads page has a SHA-256 sidecar link under each release that points at the published hash for that build.
Compute the hash of your downloaded MSI:
Get-FileHash .\CriticalPDF-Suite-2026.517.37.msi -Algorithm SHA256The two values should match exactly. If they don’t, do not install — re-download from the Downloads page and verify again. The same hash is also checked automatically by the service before any auto-update is applied; a mismatch fails closed and the existing version keeps running.
Step 2 — Run the installer
Double-click the MSI, or run it from an elevated PowerShell prompt:
msiexec /i CriticalPDF-Suite-2026.517.37.msi /qbFlags:
/i— install/qb— basic UI, no prompts. Use/qnfor a fully silent install (see Group Policy / SCCM for the deployment-friendly properties).
The installer:
- Installs the application into
C:\Program Files\CriticalPDF\with a Start Menu shortcut. - Installs and starts the CriticalPDF Service Windows service.
- Registers and configures the CriticalPDF virtual printer driver automatically.
- Creates
C:\ProgramData\CriticalPDF\and generatesserviceconfig.jsonthere with sensible defaults and a randomEncryptionPassword. - Unpacks the bundled runtime under the install folder.
Step 3 — Verify the install
From an elevated PowerShell prompt:
Get-Service "CriticalPDF Service"
Get-Printer CriticalPDF
You should see the service Running and the printer Idle. If the service is stuck in Stopped, see Troubleshooting.
Step 4 — Launch the app and activate your trial or license
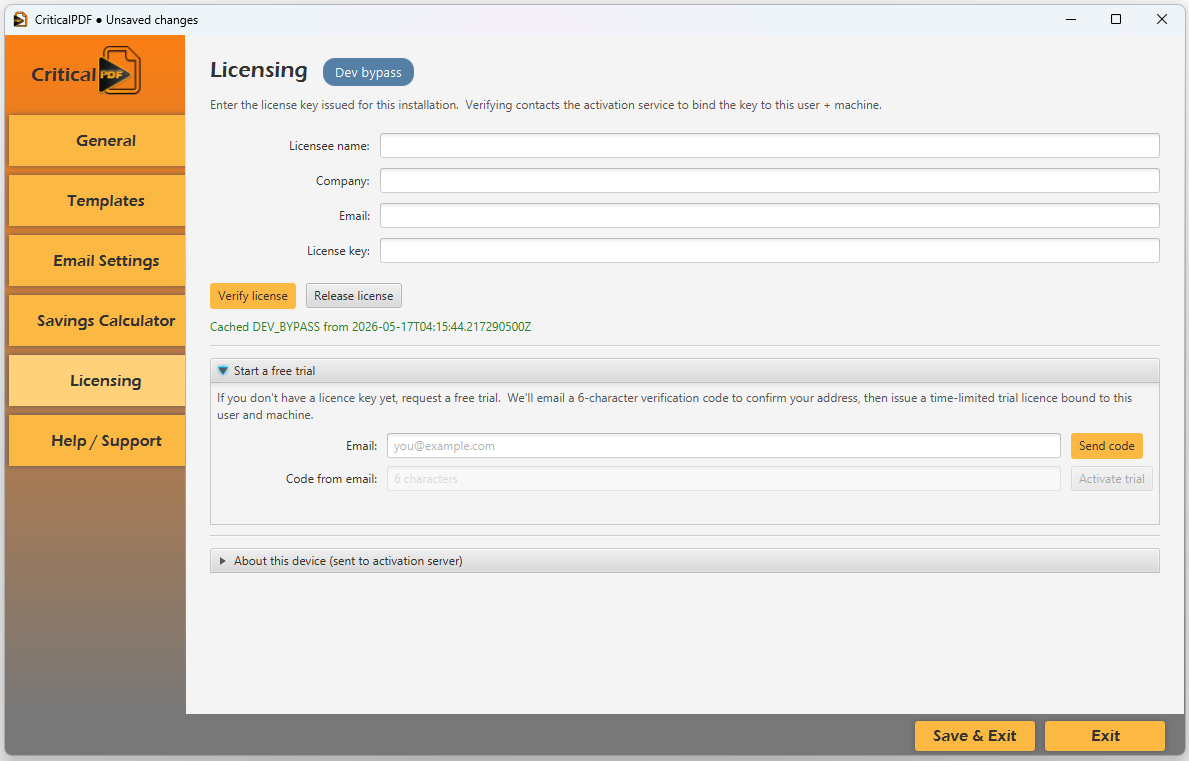
Open CriticalPDF from the Start menu, then go to Settings → Licensing:
Two ways to activate:
Existing license — fill in your Licensee name, Company, Email, and License key, then click Verify license. The app contacts the activation service to bind the key to your user account + this machine.
Free trial — open the Start a free trial section. Enter your email, click Send code, check your inbox for a six-character verification code, paste it in, and click Activate trial. The full suite unlocks for 30 days.
The activation is per-user, not per-machine — so on a shared workstation, each user activates separately. On Citrix / RDS / multi-user hosts, pre-deploying the license key via the MSI (see Group Policy / SCCM) handles activation transparently for every user.
Step 5 — First capture
You’re ready. Head to Your first capture and print a test document.
Was this page helpful? Let us know.